三维空间中的点
上一章回顾: 状态录制
- 你了解了如何通过 State 完成操作的录制和还原。
- 熟悉地使用 State 相关的方法和事件。
- 了解 Five SDK 的事件系统。
- 获取到点的三维位置。
准备工作
我们新建一个目录(src/4.points-in-3d)以及对应的 html 文件 以及 jsx 或 tsx 文件。
携带着上一章的 State 代码,太过于繁琐,那我们从 展示三维空间 章的内容的基础开发。
<!DOCTYPE html>
<html lang="en">
  <head>
    <meta charset="UTF-8" />
    <link rel="icon" href="data:;base64,iVBORw0KGgo=" />
    <meta name="viewport" content="width=device-width, initial-scale=1.0" />
    <title>三维中的点 | Points in 3d</title>
    <link
      href="https://cdn.jsdelivr.net/npm/bootstrap@5.1.1/dist/css/bootstrap.min.css"
      rel="stylesheet"
      crossorigin="anonymous"
    />
    <link
      href="https://cdn.jsdelivr.net/npm/bootstrap-icons@1.5.0/font/bootstrap-icons.css"
      rel="stylesheet"
    />
    <style>
      * {
        margin: 0;
        padding: 0;
      }

      html,
      body,
      #app {
        width: 100%;
        height: 100%;
        overflow: hidden;
      }
    </style>
  </head>

  <body>
    <div id="app"></div>
    <script type="module" src="./index"></script>
  </body>
</html>- JavaScript
- TypeScript
import { ref, onBeforeUnmount } from "vue";

function useWindowDimensions() {
  const width = ref(window.innerWidth);
  const height = ref(window.innerHeight);

  const listener = () => {
    width.value = window.innerWidth;
    height.value = window.innerHeight;
  };

  window.addEventListener("resize", listener, false);
  onBeforeUnmount(() => {
    window.removeEventListener("resize", listener, false);
  });
  return { width, height };
}
export { useWindowDimensions };<template>
<nav class="navbar fixed-bottom navbar-light bg-light">
<div class="container-fluid justify-content-center">
<div class="btn-group">
<button
:class="
state.mode == 'Panorama'
? 'btn btn-primary active'
: 'btn btn-primary'
"
@click="() => setState({ mode: Five.Mode.Panorama })"
>
全景漫游
</button>
<button
:class="
state.mode == 'Panorama'
? 'btn btn-primary'
: 'btn btn-primary active'
"
@click="() => setState({ mode: Five.Mode.Floorplan })"
>
空间总览
</button>
</div>
</div>
</nav>
</template>
<script setup>
import { useFiveCurrentState } from "@realsee/five/vue";
import { Five } from "@realsee/five";
const [state, setState] = useFiveCurrentState();
</script>
<template>
  <FiveProvider :work="work">
    <FiveCanvas :width="width" :height="height" />
    <ModeController />
  </FiveProvider>
</template>

<script setup>
import { FiveProvider, FiveCanvas } from "@realsee/five/vue";
import { parseWork } from "@realsee/five";
import { ref } from "vue";
import { useWindowDimensions } from "./useWindowDimensions";
import ModeController from "./ModeController.vue";

const work = ref();
const workURL =
  "https://vrlab-public.ljcdn.com/release/static/image/release/five/work-sample/07bdc58f413bc5494f05c7cbb5cbdce4/work.json";

fetch(workURL)
  .then((response) => response.text())
  .then((text) => (work.value = parseWork(text)));
const { width, height } = useWindowDimensions();
</script>
import { createApp, h } from "vue";
import App from "./App.vue";

createApp(App).mount("#app");
import { ref, onBeforeUnmount } from "vue";

function useWindowDimensions() {
  const width = ref<number>(window.innerWidth);
  const height = ref<number>(window.innerHeight);

  const listener = () => {
    width.value = window.innerWidth;
    height.value = window.innerHeight;
  };

  window.addEventListener("resize", listener, false);
  onBeforeUnmount(() => {
    window.removeEventListener("resize", listener, false);
  });
  return { width, height };
}
export { useWindowDimensions };<template>
<nav class="navbar fixed-bottom navbar-light bg-light">
<div class="container-fluid justify-content-center">
<div class="btn-group">
<button
:class="
state.mode == 'Panorama'
? 'btn btn-primary active'
: 'btn btn-primary'
"
@click="() => setState({ mode: Five.Mode.Panorama })"
>
全景漫游
</button>
<button
:class="
state.mode == 'Panorama'
? 'btn btn-primary'
: 'btn btn-primary active'
"
@click="() => setState({ mode: Five.Mode.Floorplan })"
>
空间总览
</button>
</div>
</div>
</nav>
</template>
<script setup lang="ts">
import { useFiveCurrentState } from "@realsee/five/vue";
import { Five } from "@realsee/five";
const [state, setState] = useFiveCurrentState();
</script>
<template>
  <FiveProvider :work="work">
    <FiveCanvas :width="width" :height="height" />
    <ModeController />
  </FiveProvider>
</template>

<script setup lang="ts">
import { FiveProvider, FiveCanvas } from "@realsee/five/vue";
import { parseWork } from "@realsee/five";
import { ref } from "vue";
import { useWindowDimensions } from "./useWindowDimensions";
import ModeController from "./ModeController.vue";

const work = ref();
const workURL =
  "https://vrlab-public.ljcdn.com/release/static/image/release/five/work-sample/07bdc58f413bc5494f05c7cbb5cbdce4/work.json";

fetch(workURL)
  .then((response) => response.text())
  .then((text) => (work.value = parseWork(text)));
const { width, height } = useWindowDimensions();
</script>
import { createApp, h } from "vue";
import App from "./App.vue";

createApp(App).mount("#app");
启动服务 npm run dev。 并跳转到当前页面 "http://localhost:3000/src/4.points-in-3d/index.html"。
请查看你的控制台,端口号会因为你的配置以及当前端口占用情况变更,请已控制台输出的为准。 如果你使用其他开发构建工具,请按照自己的开发构建工具的要求启动服务。
事件系统
在屏幕上点击时,five SDK 的默认行为是选择点击位置附近最合适的 观察点(observer) 移动过去。大部分用户的动作都是如此,就好比浏览器对于 A 标签 的处理逻辑大多都是链接跳转。上述就是 five SDK 的内建 tapGesture事件。
内建事件
five SDK 内建的事件有如下:
- tapGesture: 鼠标左键点击或者手指点击。默认行为是点位移动。
- panGesture: 鼠标按住一栋或者手指在屏幕上拖拽移动。相机旋转(Topview 下是相机平移)。
- pinchGesture: 手指双指做捏的手势。默认行为是修改相机可视角度。
- mouseWheel: 鼠标滚轮。默认行为是修改相机可视角度。
- gesture: 上述的任意事件。
阻止默认行为
所有事件和 浏览器对于 A 标签 的处理逻辑 一样,都可以阻止默认事件,你只需要监听 wants 开头的事件,在回调函数中 return false 即可。比如想阻止 tapGesture 的默认点位移动行为。可以做如下操作。
useFiveEventCallback("wantsTapGesture", () => {
  // highlight-start
  // 阻止 tapGesture 触发
  return false;
  // highlight-end
});
具体每个事件的 API 可以查看详细文档
从 tapGesture 获取坐标
我们制作一个简单功能,用于标记在画布上点击的三维位置。 但是为了和 点位移动 功能不冲突,我们用一个
Switch按钮来控制标记状态是否开启。
头部添加依赖
本章需要介绍一下 three.js 了。three.js 是一个三维图形库,Five SDK 使用 three.js 的数学库和渲染器。本章涉及 three.js 有两个内容,在这里做一些说明,你不必完全了解 three.js, 我做一些说明你就可以理解。
THREE.Vector3: 你可以就认为是一个{ x: number, y: number, z: number }的结构体,并且多加了一些数学方法(本次不会用到数学方法,只是记录 xyz)THREE.Raycaster: 光线投射类。你可以简单的理解为屏幕上的一个点对应到三维空间是一条射线。
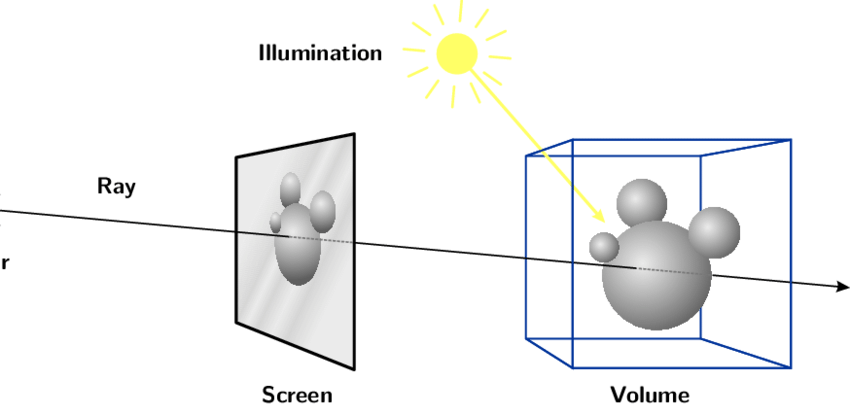 ;
;
射线有很多作用,比如:通过射线和模型之前的相交性检测,就可以判断是否对象被选中。
编写 MarkController 组件
- 添加一个 MarkController 文件,用于编写组件。
- 我们通过 active Vue Ref 响应性 API 结合 v-model 来控制当前应用是否在标记的模式下。
- 通过
tapGesture第一个参数是raycaster,通过modelIntersectRaycaster可以获取到焦点信息intersect,intersect.point就是交点的坐标。 - 通过
marksVue Ref 来存储所有交点,并且实现收集和删除。
- JavaScript
- TypeScript
<template>
  <div class="card position-fixed m-2 top-0 start-0">
    <div class="form-check form-switch m-2">
      <input class="form-check-input" type="checkbox" v-model="isSwitch" />
      <label class="form-check-label" for="flexSwitchCheckDefault">标记</label>
    </div>
    <div class="js-marks" v-if="marks.length > 0">
      <p v-for="(v3, index) in marks" calss="badge bg-primary d-block m-2">
        <span
          >x={{ v3.x.toFixed(2) }} y={{ v3.y.toFixed(2) }} z={{
            v3.z.toFixed(2)
          }}</span
        >
        <i
          class="bi bi-x-circle ms-2"
          @click="
            () => {
              removeMark(index);
            }
          "
        ></i>
      </p>
    </div>
  </div>
</template>
<script setup>
import {
  useFiveEventCallback,
  useFiveModelIntersectRaycaster,
} from "@realsee/five/vue";
import { Raycaster } from "three";
import { ref } from "vue";
const marks = ref([]);
const isSwitch = ref(false);
const raycasterRef = ref(new Raycaster());
const fiveModelIntersectRaycaster = useFiveModelIntersectRaycaster();
const intersect = fiveModelIntersectRaycaster(raycasterRef);

useFiveEventCallback("wantsTapGesture", (raycaster, tapPosition) => {
  if (isSwitch.value) {
    raycasterRef.value = raycaster;
    if (intersect.value[0]?.point) marks.value.push(intersect.value[0]?.point);
    return false;
  }
});

const removeMark = (index) => {
  marks.value.splice(index, 1);
};
</script><template>
<div class="card position-fixed m-2 top-0 start-0">
<div class="form-check form-switch m-2">
<input class="form-check-input" type="checkbox" v-model="isSwitch" />
<label class="form-check-label" for="flexSwitchCheckDefault">标记</label>
</div>
<div class="js-marks" v-if="marks.length > 0">
<p v-for="(v3, index) in marks" calss="badge bg-primary d-block m-2">
<span
>x={{ v3.x.toFixed(2) }} y={{ v3.y.toFixed(2) }} z={{
v3.z.toFixed(2)
}}</span
>
<i
class="bi bi-x-circle ms-2"
@click="
() => {
removeMark(index);
}
"
></i>
</p>
</div>
</div>
</template>
<script setup lang="ts">
import {
useFiveEventCallback,
useFiveModelIntersectRaycaster,
} from "@realsee/five/vue";
import { Raycaster } from "three";
import { ref } from "vue";
const marks = ref<THREE.Vector3[]>([]);
const isSwitch = ref(false);
const raycasterRef = ref<Raycaster>(new Raycaster());
const fiveModelIntersectRaycaster = useFiveModelIntersectRaycaster();
const intersect = fiveModelIntersectRaycaster(raycasterRef);
useFiveEventCallback("wantsTapGesture", (raycaster, tapPosition) => {
if (isSwitch.value) {
raycasterRef.value = raycaster;
if (intersect.value[0]?.point) marks.value.push(intersect.value[0]?.point);
return false;
}
});
const removeMark = (index: number) => {
marks.value.splice(index, 1);
};
</script>使用标记组件
插入到 App 文件的 FiveProvider 中
- JavaScript
- TypeScript
<template>
  <FiveProvider :work="work">
    <FiveCanvas :width="width" :height="height" />
    <ModeController />
    // highlight-start
    <MarkController />
    // highlight-end
  </FiveProvider>
</template>

<script setup>
import { FiveProvider, FiveCanvas } from "@realsee/five/vue";
import { parseWork } from "@realsee/five";
import { ref } from "vue";
import { useWindowDimensions } from "./useWindowDimensions";
import ModeController from "./ModeController.vue";
// highlight-start
import MarkController from "./MarkController.vue";
// highlight-end

const work = ref();
const workURL =
  "https://vrlab-public.ljcdn.com/release/static/image/release/five/work-sample/07bdc58f413bc5494f05c7cbb5cbdce4/work.json";

fetch(workURL)
  .then((response) => response.text())
  .then((text) => (work.value = parseWork(text)));
const { width, height } = useWindowDimensions();
</script><template>
<FiveProvider :work="work">
<FiveCanvas :width="width" :height="height" />
<ModeController />
// highlight-start
<MarkController />
// highlight-end
</FiveProvider>
</template>
<script setup lang="ts">
import { FiveProvider, FiveCanvas } from "@realsee/five/vue";
import { parseWork, Work } from "@realsee/five";
import { ref } from "vue";
import { useWindowDimensions } from "./useWindowDimensions";
import ModeController from "./ModeController.vue";
// highlight-start
import MarkController from "./MarkController.vue";
// highlight-end
const work = ref<Work>();
const workURL =
"https://vrlab-public.ljcdn.com/release/static/image/release/five/work-sample/07bdc58f413bc5494f05c7cbb5cbdce4/work.json";
fetch(workURL)
.then((response) => response.text())
.then((text) => (work.value = parseWork(text)));
const { width, height } = useWindowDimensions();
</script>回到你的浏览器查看,会发现你的页面左上角出现一个选择开关。打开开关,点击画布内容,会输出点击位置的坐标。
真棒,一下子就理解和获取到了三维坐标 🥳 。